Friday 25 April 2014

Rainbow Honey Midnight Garden Mosaic Stained Glass Nail Art

Woot - another post live from Dublin! The weather is quite nice here which is apparently unusual but I am not going to complain. I haven't taken as many photos as I've wanted to - I am not sure if it's out of forgetting but sometimes it is to have those memories for yourself sometimes, and not necessarily to show others. (As a photographer, that's pretty much paradox but ah well!) I really do believe that sometimes it's good to live your own life without having to post on social media sometimes. We're in an age of oversharing. But speaking of oversharing, I'm not done with sharing some more Rainbow Honey Midnight Garden nail art. Last time I pulled a bold one and did a water marble, this time I went with a mosaic stained glass inspired look.

Rainbow Honey Midnight Garden Mosaic Stained Glass Nail Art

For this look, I started with a foundation of white using Sally Hansen White Out and then drew some rough light guidelines using a Kiss black striper:

Rainbow Honey Midnight Garden Mosaic Stained Glass Nail Art

Then, I filled in all the spaces with the Rainbow Honey Midnight Garden cremes: Charaxes (blue), Cymbidium (pink), Viola (purple) and Tayabak (green). I made sure none of the colours touched (welp tried to, anyway):

Rainbow Honey Midnight Garden Mosaic Stained Glass Nail Art

Looks pretty rough! But then I went over the guidelines again with the Kiss black striper and outlined my nails as well. I finished it off with a coat of Seche Vite and ended up REALLY digging this boldness:

Rainbow Honey Midnight Garden Mosaic Stained Glass Nail Art

Rainbow Honey Midnight Garden Mosaic Stained Glass Nail Art

Rainbow Honey Midnight Garden Mosaic Stained Glass Nail Art

Rainbow Honey Midnight Garden Mosaic Stained Glass Nail Art

And for funsies, here's how it looks matteified, using OPI Matte Top Coat:

Rainbow Honey Midnight Garden Mosaic Stained Glass Nail Art

Rainbow Honey Midnight Garden Mosaic Stained Glass Nail Art

Rainbow Honey Midnight Garden Mosaic Stained Glass Nail Art

Rainbow Honey Midnight Garden Mosaic Stained Glass Nail Art

Overall I am pretty happy with the result!

Anyway sorry I haven't left any comments on your blogs - I promise I will the next chance I get to be on the computer for an extended period of time! My vacation is a third way done and I am already dreading the end! I just have to chin up and keep living in the present. Sometimes a hard thing to do for me!

How are all of you? I hope all of you are doing well. I hope you like this stained glass nail art as much as I do! It took a while but it was worth it.

Monday 21 April 2014

Born Pretty Store "Punk Metal Heart Round Square Star Drop Mix Stud Rhinestones Nail Art Decoration w/box Sale" Review

Hola I am live from Dublin - my jet lagged self is having perhaps the worst time adjusting to the time zone here (8 hours into the future from my home base) but alas I am here today with a review on some studs from Born Pretty Store. Just a reminder, I do have a blog coupon for Born Pretty Store - they not only sell the nail art studs that are featured on this post today, but they also have fun cute cell phone dongles, midi rings (which are totally my favourite things right now), hair accessories and of course - PLENTY of nail art supplies. For 10% off and free world wide shipping, use this code at check-out: ARBQ10

Onto the nail art studs - these are listed on the Born Pretty Store website as "200pcs Punk Metal Heart Round Square Star Drop Mix Stud Rhinestones Nail Art Decoration w/box Sale" item code #7277. I really love this mix because of all the variation of studs. There are so many possibilities! Here's how the studs came packed:

Born Pretty Store Punk Metal Mixed Nail Art Art Studs

And here's a shot of all the different studs. Each stud that is out represents one of the sections in the container pack - so as you can see I have a lot more silver hearts and only one section of gold circles, gold long diamonds, and silver stars:

Born Pretty Store Punk Metal Mixed Nail Art Art Studs

Because of all the variation, I was able to do "skittle studs". I actually quite like this look - using one polish and then having a different stud or stud design on each nail. Here's a look at silver skittle stud nail art over top of Rainbow Honey Evening Viola:

Born Pretty Store Punk Metal Mixed Nail Art Art Studs

Born Pretty Store Punk Metal Mixed Nail Art Art Studs

Born Pretty Store Punk Metal Mixed Nail Art Art Studs

Born Pretty Store Punk Metal Mixed Nail Art Art Studs

And on the flip side, here's some gold stud skittle nails done over top of Rainbow Honey Trifolium - gold and green always seem to go perfectly with one another!:

Born Pretty Store Punk Metal Mixed Nail Art Art Studs

Born Pretty Store Punk Metal Mixed Nail Art Art Studs

Born Pretty Store Punk Metal Mixed Nail Art Art Studs

Born Pretty Store Punk Metal Mixed Nail Art Art Studs

Here's my helpful hints when designing some stud nail art:

1) Sometimes simple is best! Less is more.
2) Squares can also be diamonds - flip them.
3) Odd numbers of the same shape look best
4) Sandwich the studs in top coat, or use nail glue
5) Studs are best closer to the cuticle to avoid any catching

Overall, I am pretty happy with these studs! The hearts are best suited on larger nails, but other than that, it's a great sampler for all the different shapes. I could have been just as happy using just teardrops, but it's so nice to have an option to do more. Again, if you're interested in these studs, you can get them at the "200pcs Punk Metal Heart Round Square Star Drop Mix Stud Rhinestones Nail Art Decoration w/box Sale" item code #7277 page and use my blog coupon for 10% off and free world wide shipping: ARBQ10

How do you like to use your nail art suds? Any hints that you like to follow?

Full disclosure: This sample was provided for an unbiased review.

Thursday 17 April 2014

OPI Sheer Tints Top Coats Swatch and Review Nail Art MEGAPOST! (OPI Be Magentale With Me, OPI I'm Never Amberassed, OPI I Cant Teal You Like Me, OPI Don't Violet Me Down)

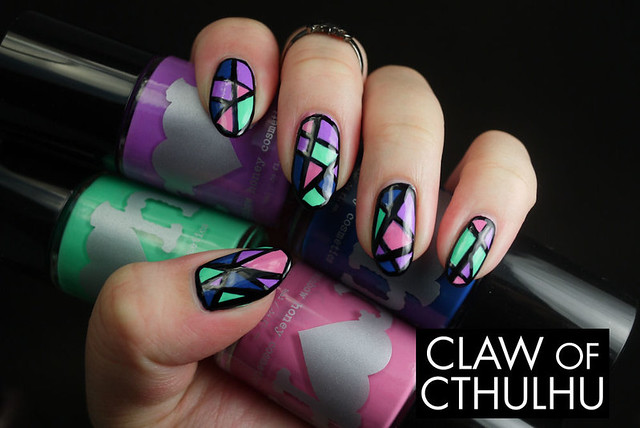
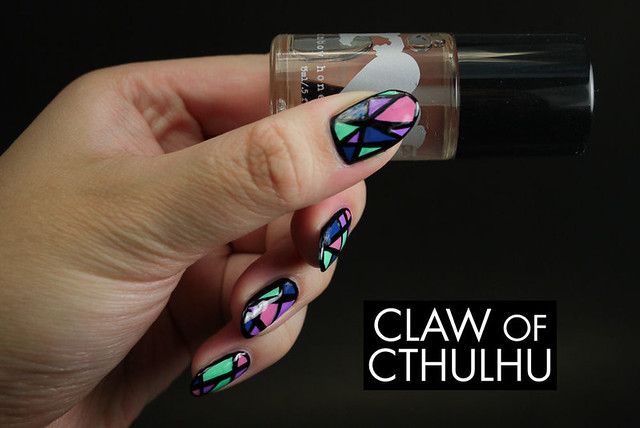
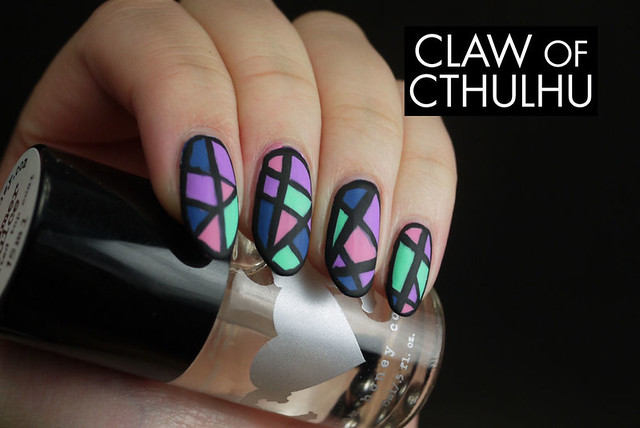
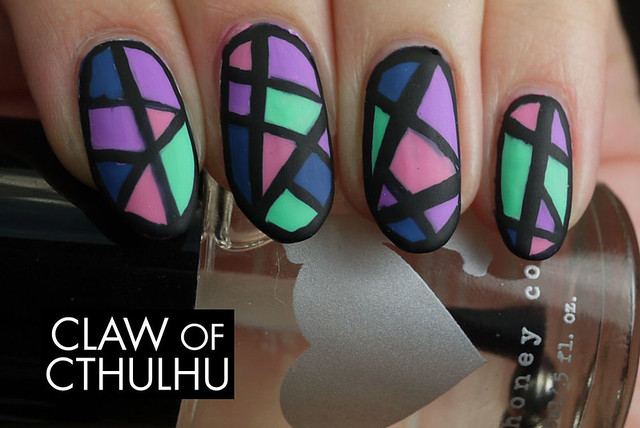
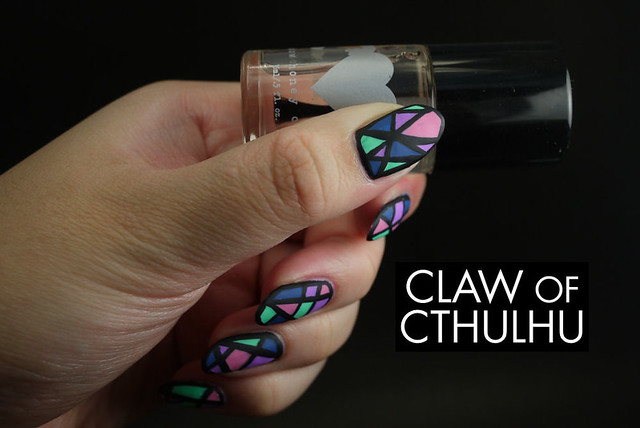
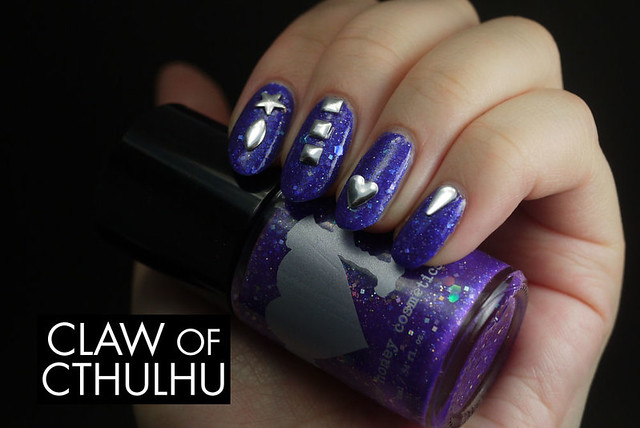
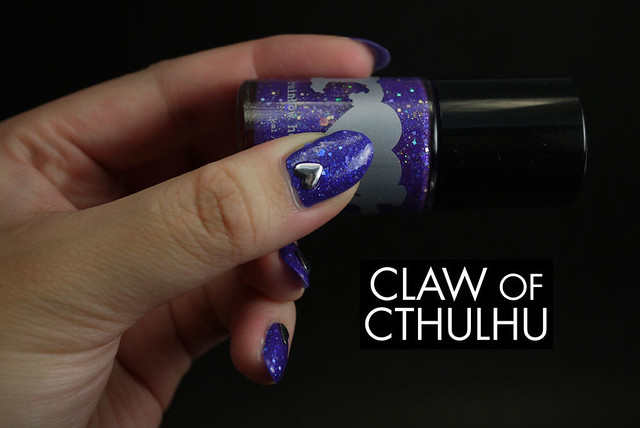
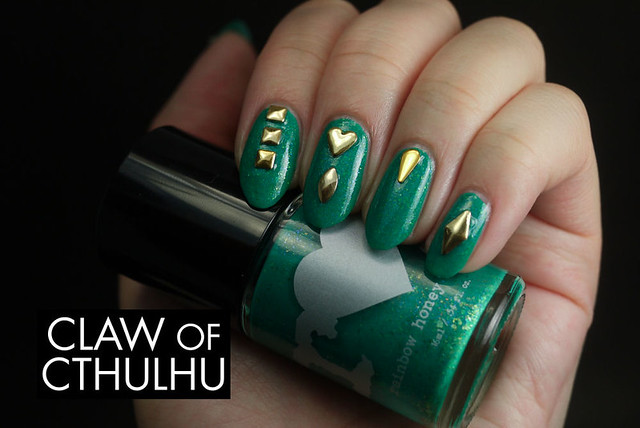
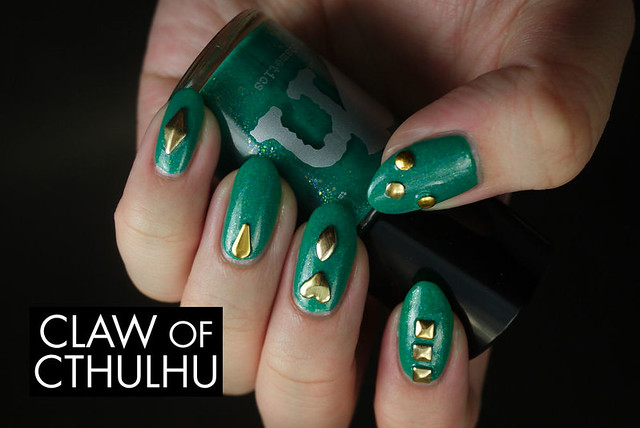
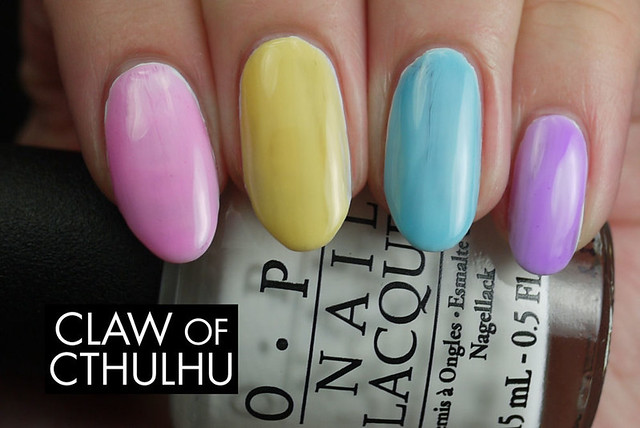
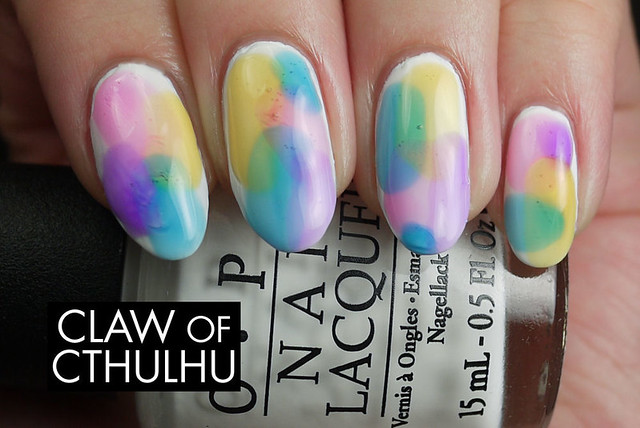
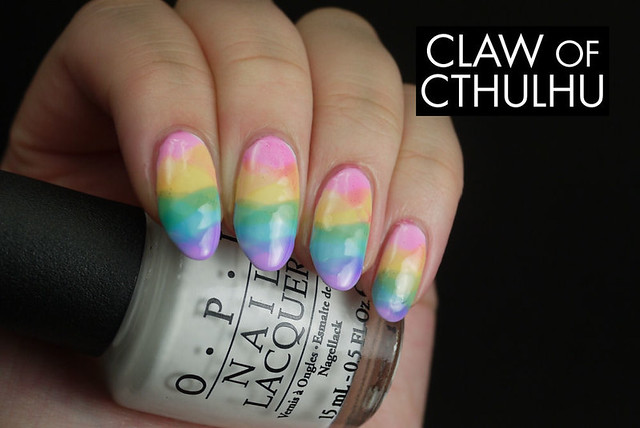
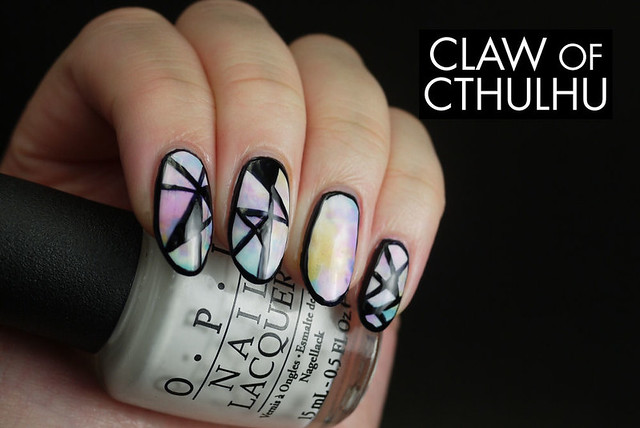
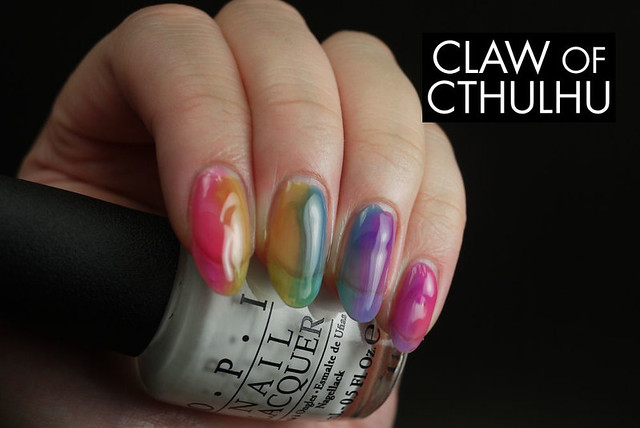
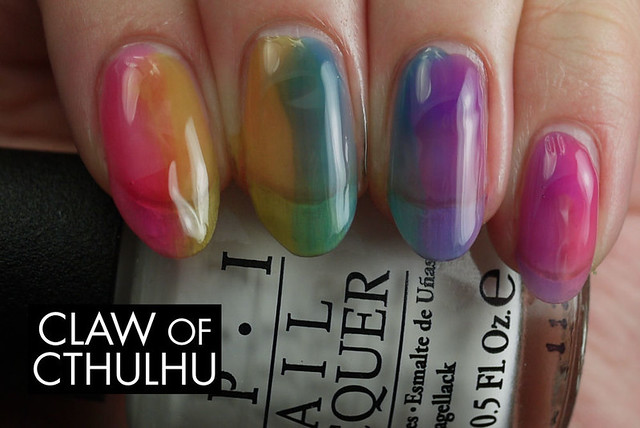
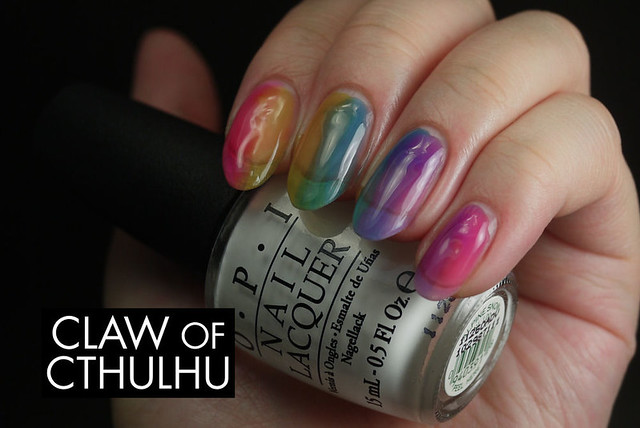
Alright, so I have been saving "the best for last" so to speak. I wanted to leave my blog unattended with a "good one" so, here it is. I'll be on a plane to Europe in no less than 6 hours and I'll update here and there when I am over. But in the meantime, here's my 30 photo MEGAPOST of the new OPI Sheer Tints! To kick it off, here's my current nails and what I'll my wearing on my fingertips to Euroland:

OPI Sheer Tints

OPI Sheer Tints

OPI Sheer Tints

OPI Sheer Tints

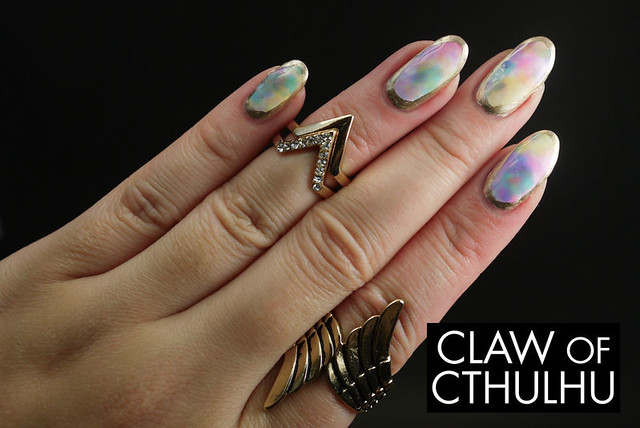
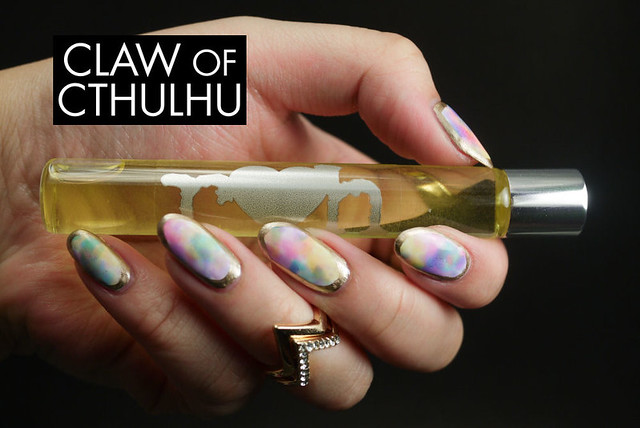
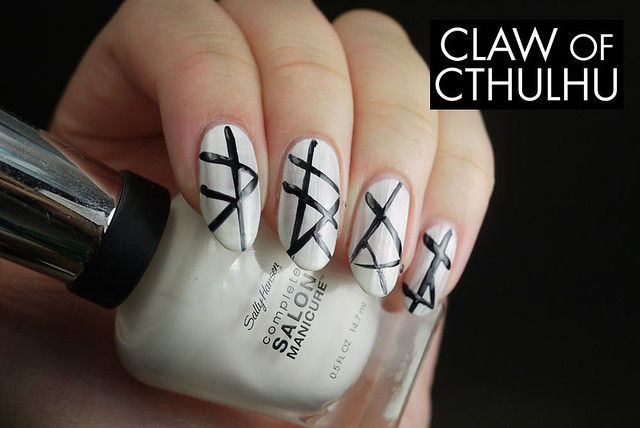
I did the above nails using Saran Wrap, as advised to me by Caitlin from Addicted to Lacquer. I didn't think it would work because of the top coat formula, but painting the top coat directly onto the wrap and dabbing it made for an AWESOME look. I finished the look by outlining all my nails with a fine nail art brush and Essie Good As Gold, then finished it off with a coat of Seche Vite! REALLY happy with these!

But when I first saw these sheer tints, I just saw people swatching them over white, or over their bare nail and I found ZERO appeal. I thought they were the stupidest things I had ever seen. But then Amanda from Sweetheart Nail Art posted Sailor Moon transformation nail art and I was sold. OK, fine. I'll bite the bullet.

Here's what the OPI Sheer Tints look like on the bare nail. From left to right: OPI Be Magentale With Me, OPI I'm Never Amberassed, OPI I Cant Teal You Like Me, OPI Don't Violet Me Down. (Yup, OPI does indeed take the cake on worst puns ever!)

Here's one coat...

OPI Sheer Tints

Here's two coats...

OPI Sheer Tints

Here's three coats...

OPI Sheer Tints

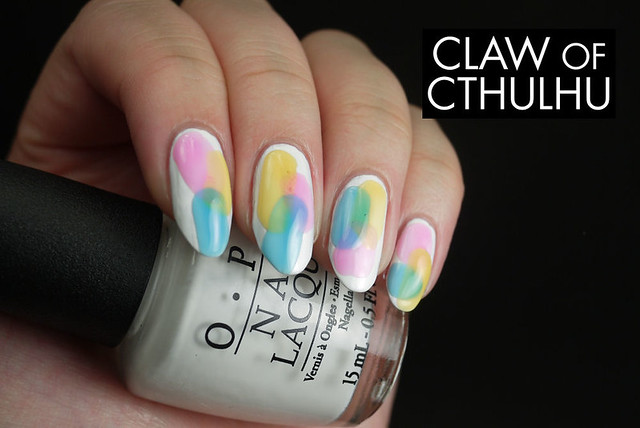
And here's OPI Sheer Tints over top one coat of OPI White Alpine:

One coat...

OPI Sheer Tints

Two coats...

OPI Sheer Tints

Three coats...

OPI Sheer Tints

As you can see, they're nothing really special on their own. The formula is top coat, so it can be fairly "goopy" when applying. You can also easily get bubbles due to layering and thick application, but I don't think it's too bad. The great thing about the thick top coat formula is that it's SO easy to mix colours! They just sink right into each other!

But I truly think that OPI Sheer Tints are destined for something better... They work flawlessly together. Here's the initial experimenting I did - Amanda told me she only picked up the magenta, amber and teal sheer tints as they are primary colours and can mix well with one another.

Here's a "primary only" experiment with sheer tint "blobbing":

OPI Sheer Tints

And added violet sheer tint...

OPI Sheer Tints

OPI Sheer Tints

OPI Sheer Tints

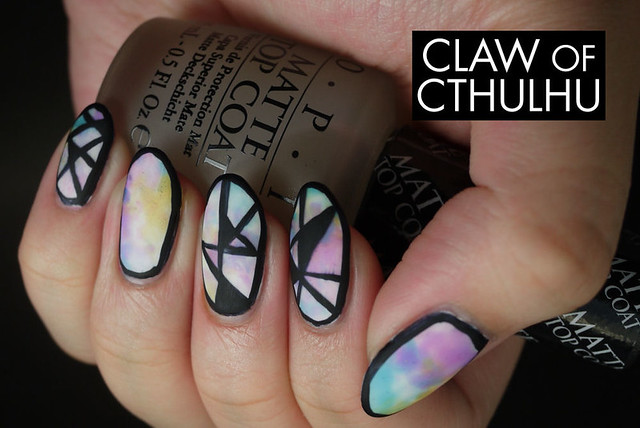
And of course, how does it look with OPI Matte Top Coat?

OPI Sheer Tints

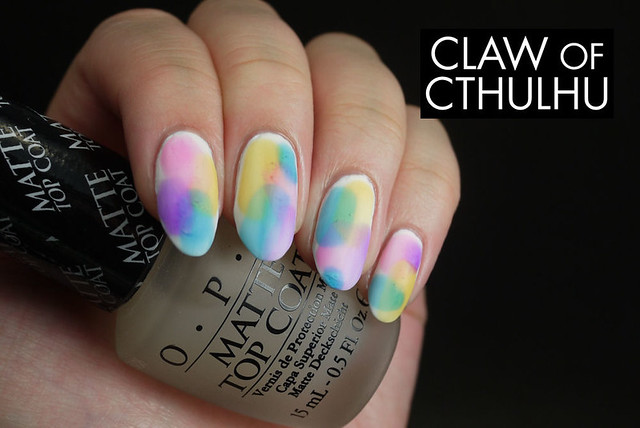
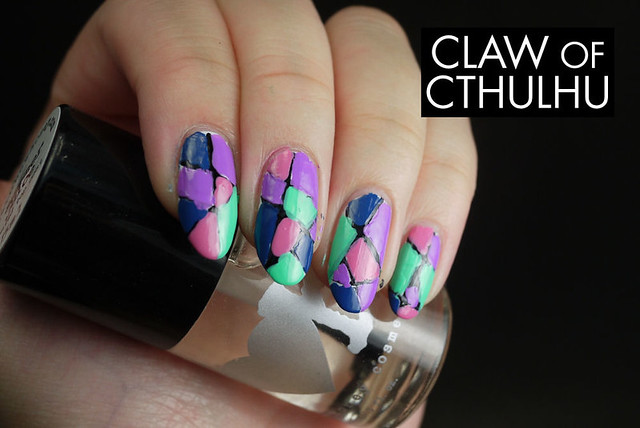
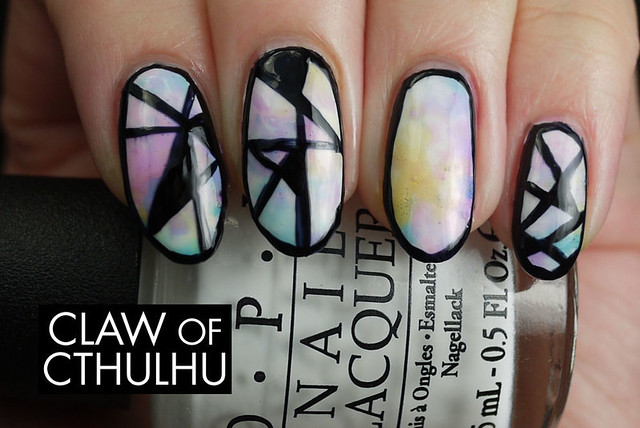
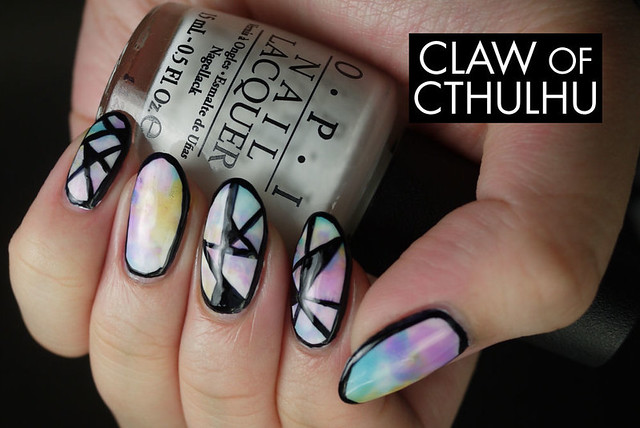
... Pretty fucking good. I added some geometric shapes (which actually kickstarted my obsession with outlining my nails and doing geometric patterns but I have improved since)...

OPI Sheer Tints

... They're OK.

I tried to do fishtail tints but was unable to control my brush work. Instead I made some pretty crazy vibrant rainbows!

OPI Sheer Tints

OPI Sheer Tints

OPI Sheer Tints

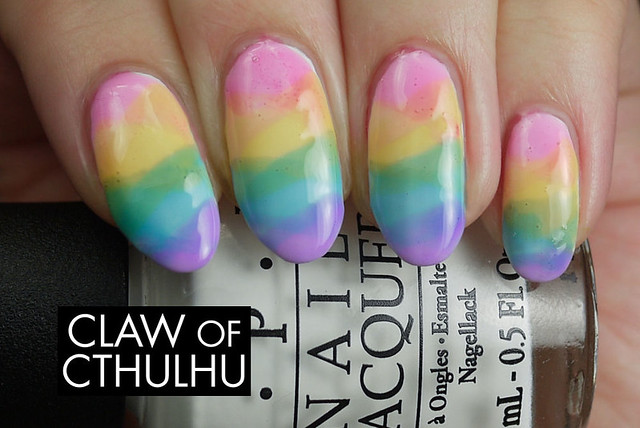
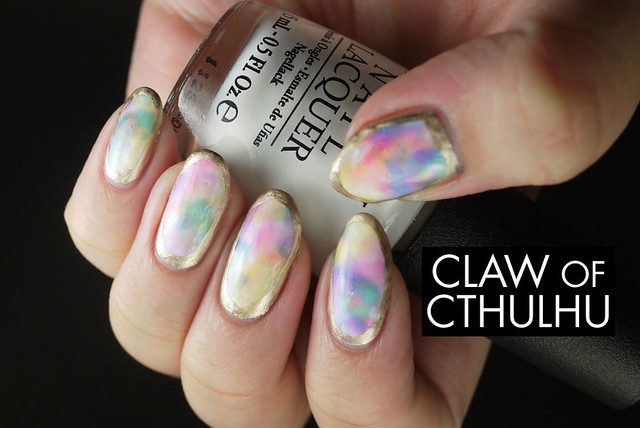
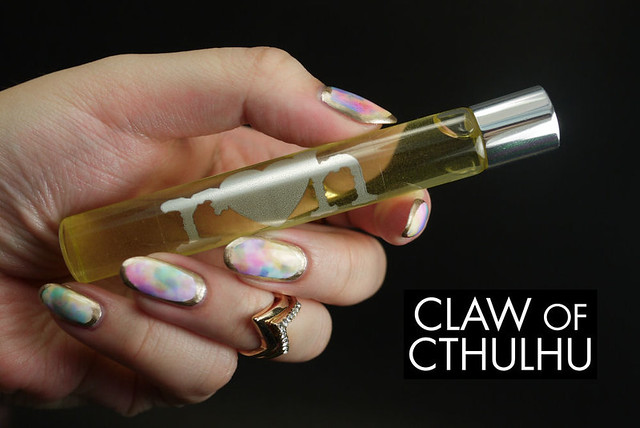
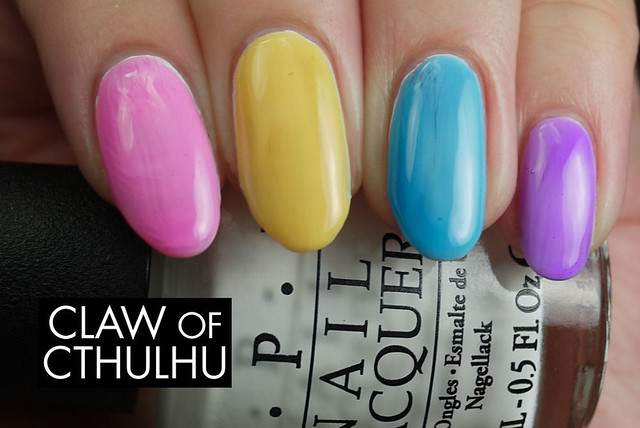
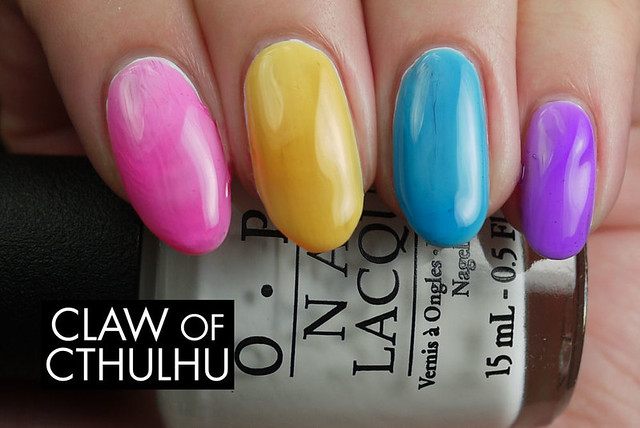
And this is what made me think, "yes I am SO glad I got these"... Caitlin suggested I tried the Saran Wrap nails. I looked up how to do Saran Wrap Nails - you paint on one coat of polish, let it dry, paint another colour on top and before it dries, dab some of it off with Saran Wrap. Unfortunately, that would never work with because the top coat formula is VERY thick and adhesive, and it would make a mess! Bbbbbbut I painted saran wrap pieces with sheer tints and I looooove the look! They look like Poprageous' Heaven Legz leggings!

OPI Sheer Tints

OPI Sheer Tints

OPI Sheer Tints

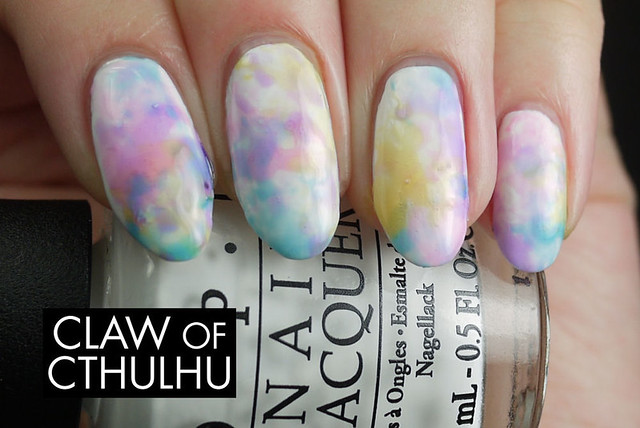
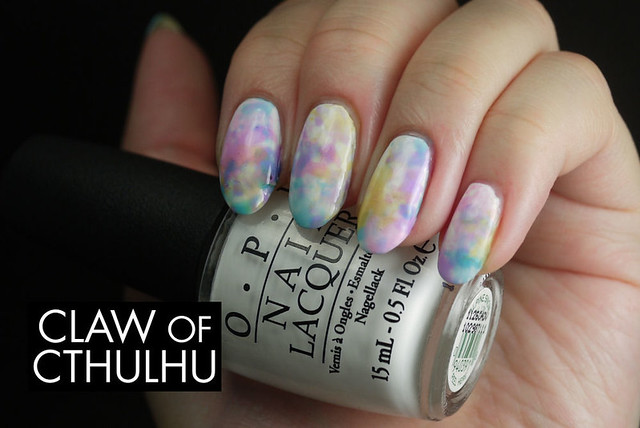
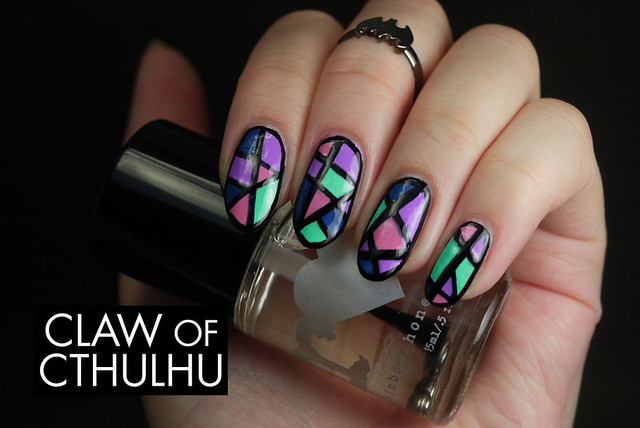
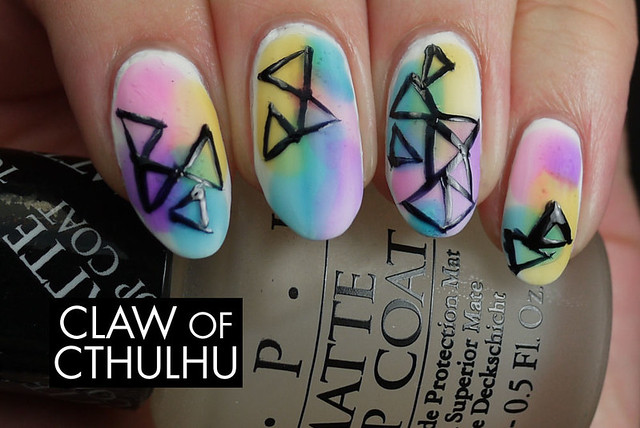
And of course... Started getting obsessing with the geometry and outlining, so this is what it started going into...

OPI Sheer Tints

OPI Sheer Tints

OPI Sheer Tints

OPI Sheer Tints

Looks pretty good with OPI Matte Top Coat too:

OPI Sheer Tints

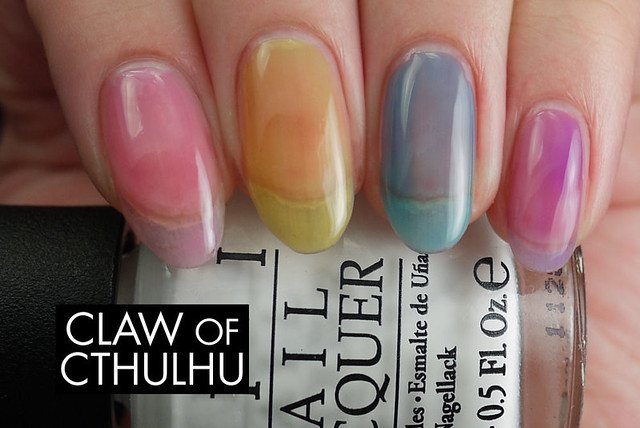
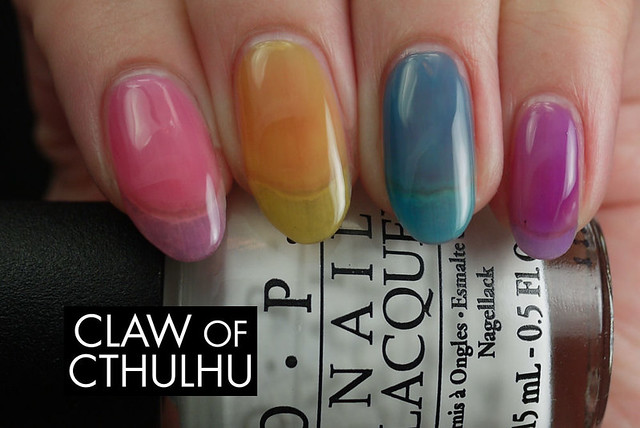
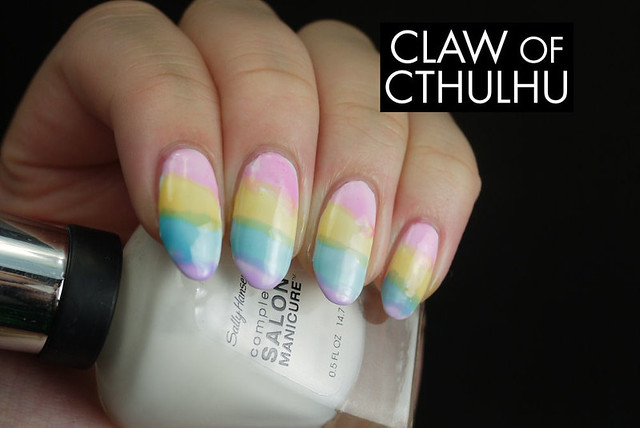
Here's a bare nail gradient rainbow with OPI Sheer Tints - I don't like it too much as I applied too many coats and should have left it more sheer but it's still cool you can do this.

OPI Sheer Tints

OPI Sheer Tints

OPI Sheer Tints

I hope you enjoyed this OPI Sheer Tint megapost! I know you can replicate a lot of this nail art with acetone but sheer tints makes it SO easy. Honestly, I am in love. (Love them so much, I had to take them on my tips to Europe with me! High praise!) Yes, the formula is VERY thick - it's top coat, after all - so you might be surprised at first on how they apply, and how they mix but I think you get used to it rather quickly and will be happy with the mixing results. It just works!

Anyway that's all for now, I'll update next weeks at some point on my Europe adventures! In the meantime, have you seen these OPI Sheer Tints? What do you make of them? What nail art would you attempt with these babies?