Wednesday, 9 April 2014

Rainbow Honey Swordlily Swatch and Review (Bonus: Rainbow Honey Poffin Party Swatch)

I can't believe it but I can't believe that I have about a week left until I leave to Europe for a month! Gahhh it's coming up so soon and because I was sick for two weeks, I am so behind, ahhhhh!!! #firstworldproblems But nonetheless, I am really excited because I am going to try and get back to a place where I'm taking photos out of passion again. I am bringing the smallest amount of clothes and packing cameras! I'll definitely miss having my nail polish too - so I think I am going to try and locate a bottle of OPI Nail Envy Matte over yonder and bring my cuticle creams. It's gonna be cray - so I'll try to update this blog as much as I can during the next week and update once a week as well. ANYHOO, today I've got a nice spring shade!

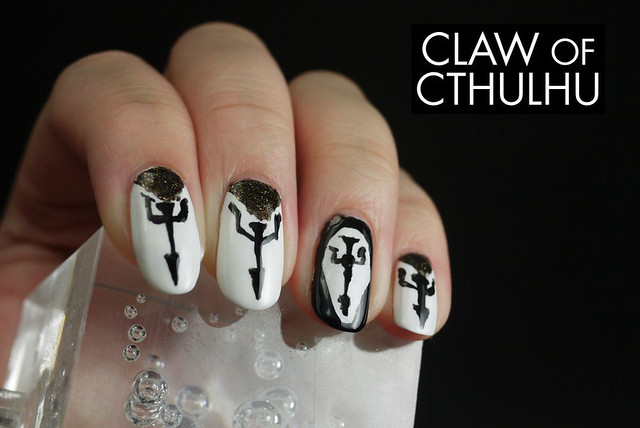
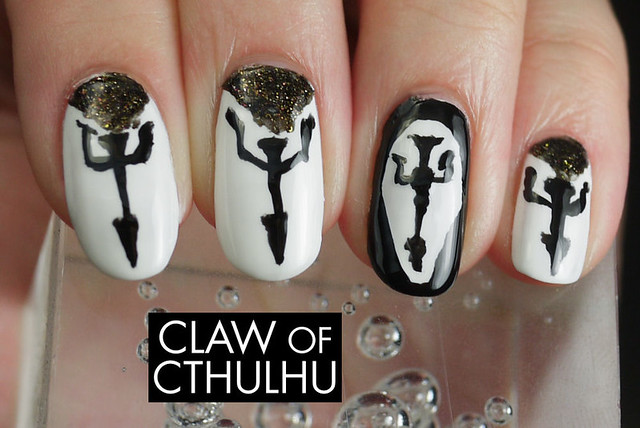
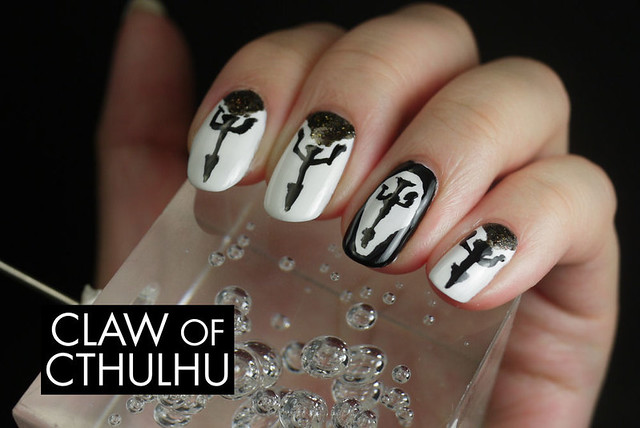
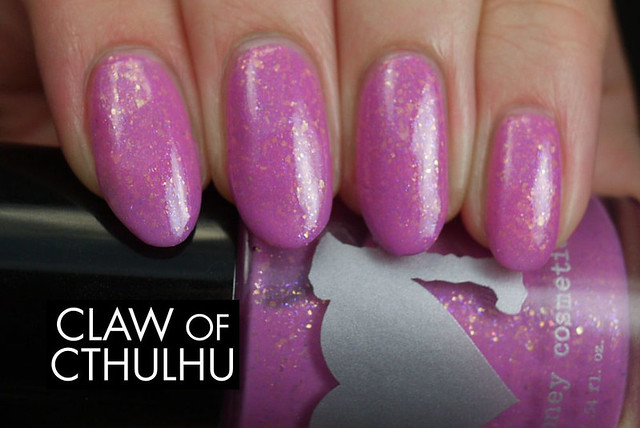
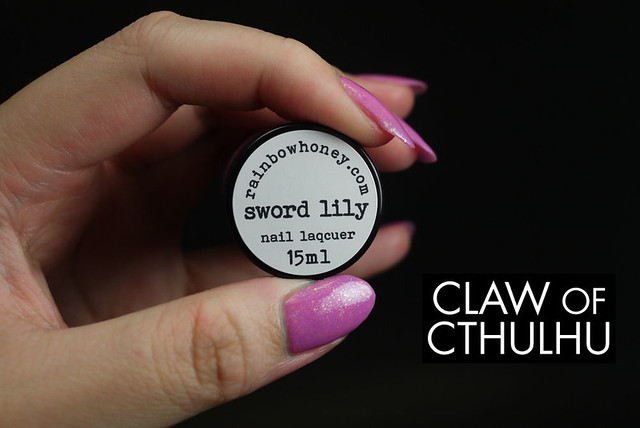
This is Rainbow Honey Swordlily, from the Midnight Garden collection. It's a purple light magenta toned polish with a ton of gold flakes. The flakes are gorgeous! The formula was great, only took two coats for full coverage. Here's my swatch without top coat:

Rainbow Honey Swordlily Swatch

Rainbow Honey Swordlily Swatch

Rainbow Honey Swordlily Swatch

Rainbow Honey Swordlily Swatch

Rainbow Honey Swordlily Swatch

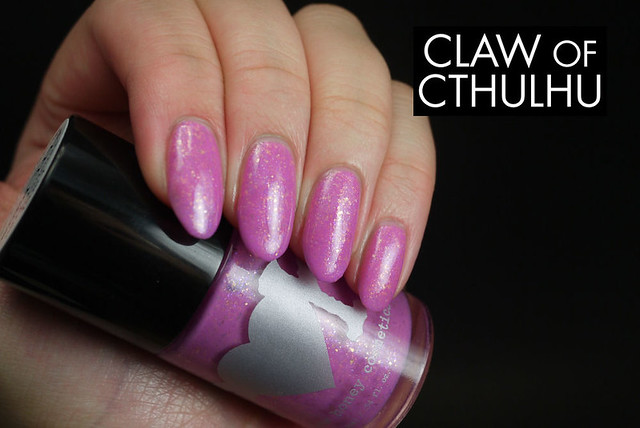
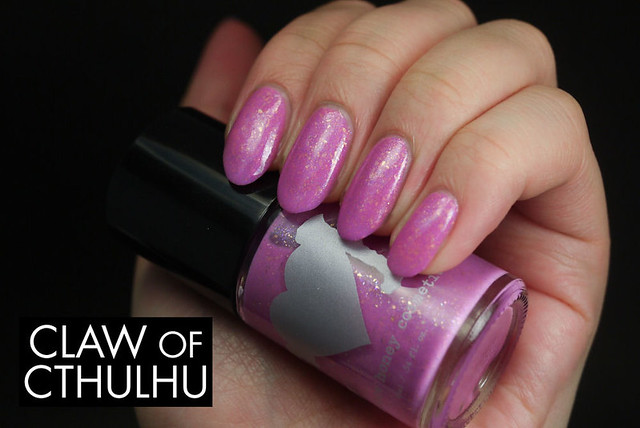
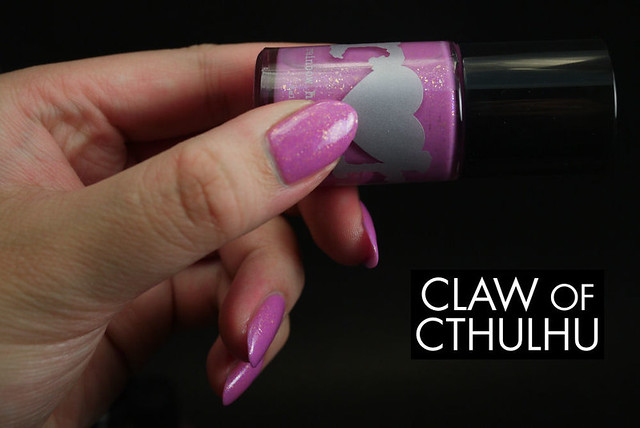
Honestly, I love this colour. It's perfect for spring - and very pretty. I think that my skintone, however, is not best suited with this shade. It kind of sucks, but that doesn't mean that I don't love this colour! I'm going to have to play around with perhaps incorporating it with nail art - I can see some awesome ideas pairing it with black.

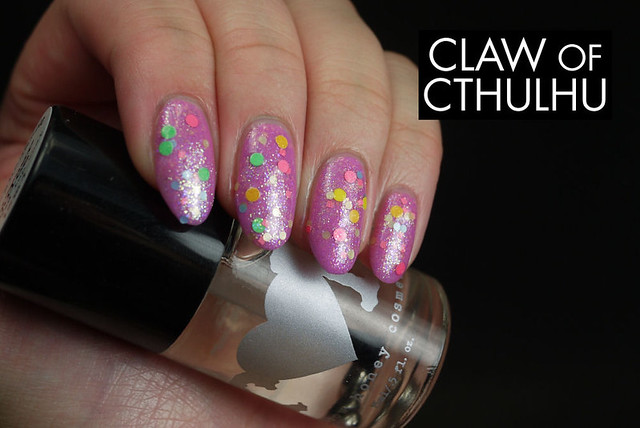
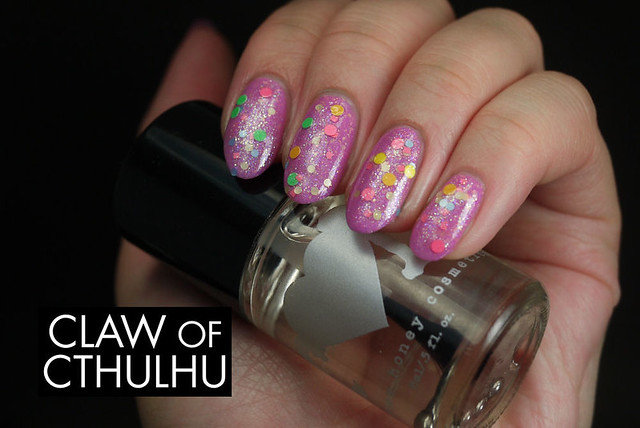
Aaaaand the bonus swatch... I got Rainbow Honey Poffin Party with my February Mystery Bag. It's a clear suspension base packed with shimmer, and multi-sized pink, yellow, green, orange, blue circle glitter and pink square glitters. Here's Rainbow Honey Poffin Party without any top coat:

Rainbow Honey Swordlily Swatch (with Rainbow Honey Poffin Party and no top coat)

Rainbow Honey Swordlily Swatch (with Rainbow Honey Poffin Party and no top coat)

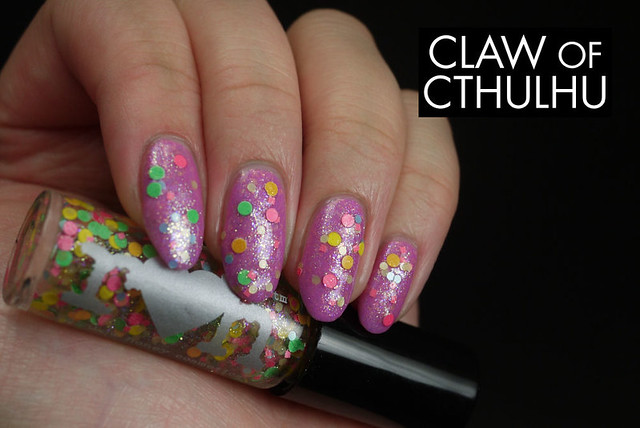
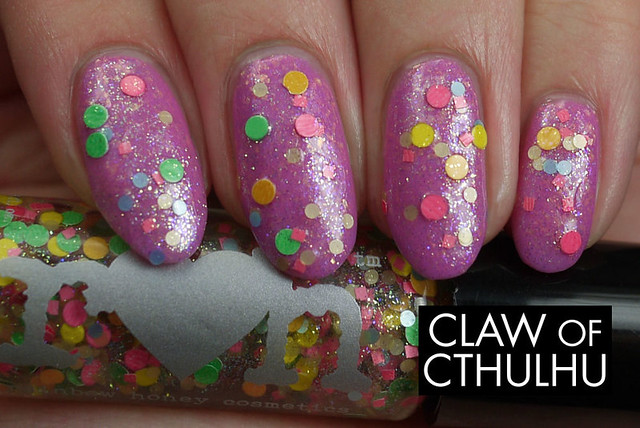
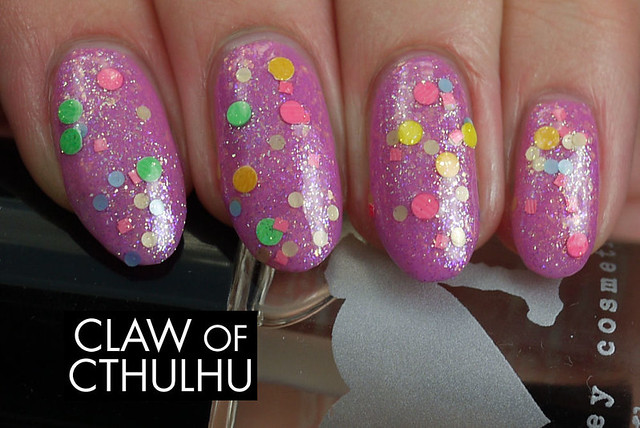
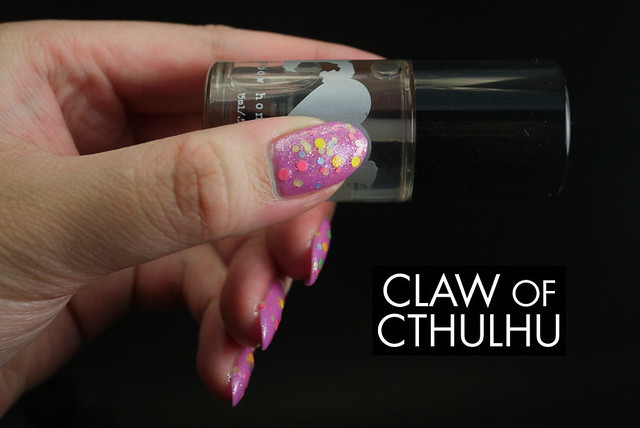
Welp, I am going to have to be honest with myself and say: I don't like this polish. I feel bad - I want to like this polish, it looked very cute in the bottle, the colours go so well together - it's based on Pokemon! But... I don't like this polish. What's not to love? The large circle glitters really ruined it for me: They're absurdly thick, and they look as though the colours have been printed on so from a side view, you can see the whites of the material, and the flat side looks streaky. I hate to say this, I really do - I love Rainbow Honey and this will sadly not be a full sized bottle that I will be purchasing. I have a full collection but I just can't see myself wanting to use this polish.

I tried to resolve the thick glitter syndrome by using two coats of Seche Vite, but sadly they were still so thick on the nail. Here's some swatches of that:

Rainbow Honey Swordlily Swatch (with Rainbow Honey Poffin Party)

Rainbow Honey Swordlily Swatch (with Rainbow Honey Poffin Party)

Rainbow Honey Swordlily Swatch (with Rainbow Honey Poffin Party)

Rainbow Honey Swordlily Swatch (with Rainbow Honey Poffin Party)

What do you think of Swordlily - do you have any spring time favourite nail polishes in your collection? What do you think of Poffin Party? Have you dealt with this type of thick glitter before?

Tuesday, 8 April 2014

Revlon 736 Elusive Swatch and Review

I am wearing Pokemon on my leggings today and it makes me a happy panda even though sometimes I question my shitty choices in fashion and wondering if I am ever going to dress my age. Just whenever I dress nice, I feel like an imposter. HAY GUYZ I AM A BIZNIZ WO-MAN. Anyway, today is Tuesday and it's cheap day - I might even grab a cheap burger today at work for lunch, but in the case that I don't, I've also got Cheap Polish Tuesday!

This is Revlon Elusive. I picked it up for $3.99 from Superstore a couple of weeks ago when I was buying medicine. Elusive is a black based jelly, packed with blue toned emerald green multi-sized hex glitters and microglitter. The formula goes on swimmingly and it only took two coats with a tad of retouch strokes to get to full opacity. It finishes to a wax/satin-like finish - I personally don't find it flattering at all. It looks far more to its namesake - elusive - when finished glossy. Here it is first with a coat of Seche Vite:

Revlon Elusive Swatch (with Seche Vite)

Revlon Elusive Swatch (with Seche Vite)

Revlon Elusive Swatch (with Seche Vite)

Revlon Elusive Swatch (with Seche Vite)

Revlon Elusive Swatch (with Seche Vite)

Here's Revlon Elusive with its natural wax/satin finish. I personally don't like it because I feel like the glitters are still bumpy. I am also a bit over this finish - if I want this finish, I'll use a matte top coat. I don't think the glitters are particular more stand out in this finish - I feel like it actually dulls it down. Not a fan. Here it is:

Revlon Elusive Swatch

Revlon Elusive Swatch

Revlon Elusive Swatch

Do you dress your age? Does it even matter? What do you think of polishes that have a "built-in" wax/satin finish? Is it soooooo 2013? Or are you still into them? Tell me what you're doing for Cheap Tuesday!

Monday, 7 April 2014

Diablo 3: Reaper of Souls - Crusader Class Inspired Nail Art

Welcome to Monday - I am missing the Bestie Nail Art challenge... Mostly because when I am left to my own devices, it's all Shitty Nail Art Monday. Today is no exception. As I was saying last week I made a whole bunch of posts to celebrate the launch of Diablo 3: Reaper of Souls but was unable to post as I was bed ridden for nearly two weeks. (My left ear FINALLY popped yesterday!) Anyway, this nail art is inspired by the new Crusader class. It was inspired by their armour sporting crosses but...

Diablo 3: Reaper of Souls -  Crusader Inspired Nail Art

Diablo 3: Reaper of Souls -  Crusader Inspired Nail Art

The base colour is Zoya Snow White. I did freehand half moon shapes with Rainbow Honey Oni and the cross shapes were painted with a fine nail art brush with OPI Black Onyx.

Diablo 3: Reaper of Souls -  Crusader Inspired Nail Art

Diablo 3: Reaper of Souls -  Crusader Inspired Nail Art

Diablo 3: Reaper of Souls -  Crusader Inspired Nail Art

I think I did a pretty awful job. I just couldn't make straight lines. There's not much to say about this but yeah... That happened.

Have you tried the new Crusader class in Diablo 3: Reaper of Souls? What do you do to make straight lines? Tell me your life hacks!

Thursday, 3 April 2014

Rainbow Honey Midnight Fountain Swatch and Review (Bonus: Iron Throne Bottle Shots)

Last post of the week and I've got something awesome/hilarious to share. I am a bit nervous because this weekend will be the first engagement shoot of 2014 - I don't know why I get nervous before my shoots. I've done dozens of weddings and engagements but the first one in a long time always gives me jitters! Blahhhh anyway I have something fun today, haha, here it goes:

Rainbow Honey Midnight Fountain Bottle

Rainbow Honey Midnight Fountain Bottle

Rainbow Honey Midnight Fountain Bottle

This is Rainbow Honey's Midnight Fountain from the new spring collection Midnight Garden... on an Iron Throne. For those of you who aren't familiar with the Iron Throne, it's an icon from Game of Thrones. As some of you know, one of my hobbies is strange toy collecting and this one weaseled its way in my collection. I think I'll be using this throne for some of my bottle shots, obviously not all the time but time to time, I think it can be a lot of fun!!!

Swatch wise, Midnight Fountain kills it! I posted a sneak peak on my Instagram last night and it matches my Pravana blue hair perfectly. It's a glitterbomb to rule them all - a beautiful mermaid blue jelly packed with holographic glitters, iridescent squares, and a healthy serving of shimmer. The Kraken's mermaid sister; this one applies gracefully - two coats, no fuss. I topped my swatch with a coat of Seche Vite:

Rainbow Honey Midnight Fountain Swatch

Rainbow Honey Midnight Fountain Swatch

Rainbow Honey Midnight Fountain Swatch

Rainbow Honey Midnight Fountain Swatch

Rainbow Honey Midnight Fountain Swatch

Overall, Midnight Fountain is amazing. I didn't want to take it off! I know this is a bit bold to say, but I think Midnight Fountain is probably my favourite polish in the Midnight Garden collection. There's a lot of great polishes in that collection, but Midnight Fountain is definitely one of the highlights or flagships of the group.

And just because you're morbidly curious like I was - I had no staining problems, which is great for a blue. I wore it over a couple of days and removed it using home made polish remover pads and the Julep "Party's Over" nail caps.

How do you get over being nervous over something that you shouldn't be nervous over? Do you like my Iron Throne bottle shots or is this just... too silly? What do you think of Midnight Fountain?

Wednesday, 2 April 2014

Julep Party's Over Glitter Nail Polish Removal Kit Review and Photos

I've got something a little different this time around today. I talked about this before I got sick, but I put on the most glitteriest (is that a word? well it is now), glitter nail polish I had to see how Julep's new "Party's Over" Glitter Nail Polish Removal Kit would stack up against it. Let's check it out.

Julep Party's Over Glitter Nail Polish Removal Kit Review

So, Julep had a sale on their "Party's Over" kit and that's when I snatched it up. I think I only saved $8 but everyone knows that an extra $8 is nice to have as a lady of lacquer! I am not a Julep Maven, so I had to pay shipping. Honestly, it wasn't too much of a big deal. I paid $3.99 for shipping which isn't too shabby from US to Canada! And no extra customs fee either, so that was great too.

Here's the instructions on the box:

Julep Party's Over Glitter Nail Polish Removal Kit Review

Julep Party's Over Glitter Nail Polish Removal Kit Review

And just to transcribe:

PARTY'S OVER
GLITTER NAIL POLISH REMOVAL KIT

You had fun, but now it's time for the glitter to go. This easy, mess-free system quickly removed even the most stubborn sparkles.

Open packette and place an aloe vera-infused pad on the nail.

Cover with nail cap. (Use large caps for thumbs.)

Once nails are covered, sit back and relax for 3-5 minutes.

Squeeze and pull to remove cap and pad. Use pad to wipe off any leftover glitter.


It came with five packs of "one-step polish remover pad"s:

Julep Party's Over Glitter Nail Polish Removal Kit Review

Julep Party's Over Glitter Nail Polish Removal Kit Review

Julep Party's Over Glitter Nail Polish Removal Kit Review

Another transcript of what it says on the packs:

An on-the-go solution for polish removal.

Each no-mess, lint-free pad is infused with aloe vera to moisturize and condition your nails.

Open packet. Apply pad to nail for a few seconds. Gently wipe off polish.

SHINE ON.

Ingredients: Acetone, Water, Aloe Barbadensis Leaf Juice, PEG-75 Lanolin. Caution: Flammable. Do not use near heat or flame. Do not ingest. Keep out of reach of children.


And here are the rubber-ish plastic caps that it came with:

Julep Party's Over Glitter Nail Polish Removal Kit Review

Julep Party's Over Glitter Nail Polish Removal Kit Review

In total, it came with ten caps. Eight of them were the same size, but there were two wider ones, which are made for thumbs.

Let's meet the contender. Here's Deborah Lippmann's Today Was A Fairytale. Three and a half coats of massive hex glitter. There are some chips that I had at the end of the week to get a head start:

Julep Party's Over Glitter Nail Polish Removal Kit Review

I opened up a pack of Julep's "One-Step Polish Removal Pad"s but noticed right away that they are not nearly as drenched as what I am familiar with when I use the foil method. Either way, I placed it on the nail, picked up a flexible nail cap, squeezed the sides and it held the pad onto the nail quite snuggly but not uncomfortably:

Julep Party's Over Glitter Nail Polish Removal Kit Review

Julep Party's Over Glitter Nail Polish Removal Kit Review

I have to admit that I felt a little funny wearing these caps on my nails, but it's no better or worse than the funny foils on the nails either. Have a look:

Julep Party's Over Glitter Nail Polish Removal Kit Review

Julep Party's Over Glitter Nail Polish Removal Kit Review

After the advised five minutes of waiting, how did it look? Sadly, not all of it was gone:

Julep Party's Over Glitter Nail Polish Removal Kit Review

Julep Party's Over Glitter Nail Polish Removal Kit Review

You can see that the pads didn't have the right amount of acetone to get the glitter off.

I just made my own with my usual method and then they glitter was completely removed. I forgot to take a shot of the cleaned nails, but here's a shot of my home made glitter polish removal pads:

Julep Party's Over Glitter Nail Polish Removal Kit Review

Just to test out the theory again, I removed another glitterbomb - Rainbow Honey's "Evening Viola" - using the Julep "Party's Over" kit nail caps, but with home made pads and it worked like a charm:

Julep Party's Over Glitter Nail Polish Removal Kit Review


Julep Party's Over Glitter Nail Polish Removal Kit Review

Julep Party's Over Glitter Nail Polish Removal Kit Review

Anyway, I think this is a great glitter removal kit. I'm not too sure what to think about the pads - not sure if that pack was a dud, or if the glitter was too OP for it, or whatever - but the caps are great. Definitely a winner over the foil folding which can be quite tedious! Price-wise, I don't think it's worth the $28 it's asking for from non-Mavens. I was happy with the $20 though. Still kind of a lot, and I am sure you can find similar caps on eBay but eh, I liked it.

Have you tried the "Party's Over" kit? How do you remove your glitter nail polish?

Tuesday, 1 April 2014

Sally Hansen Gem Crush 05 Be-Jeweled Swatch and Review (Diablo 3 Wizard Arcane Inspired Nail Art)

It's Cheap Polish Tuesday! I haven't done one of these for a while! I actually had these grandiose plans of posting every day last week, in theme with Diablo 3, as Reaper of Souls came out last week but as it turns out, I had a battle with Diab-I mean, a plague of sorts and was bed ridden. Currently I am going deaf from this head cold and I am just miserable! So, I guess I'll try to cheer myself up by posting these "Arcane" inspired nails!

Sally Hansen Gem Crush 05 Be-Jeweled Swatch (Diablo 3 Arcane Nails)

Sally Hansen Gem Crush 05 Be-Jeweled Swatch (Diablo 3 Arcane Nails)

This is just a swatch of Sally Hansen's Be-Jeweled from the Gem Crush collection that came out a year or so ago. I still see them on the shelves and they've gone down in price sub-$5, which puts it right in line for Cheap Polish Tuesday. Be-Jeweled is a nice pastel-leaning purple glitter with bits of bigger pink highlight glitters. The application was great - everything went on smoothly. The first coat was a bit patchy but the second and half coats went on smoothly as the first coat just acted as a sticky foundation for the glitter. I used a coat of Seche Vite to make things smooth.

Sally Hansen Gem Crush 05 Be-Jeweled Swatch (Diablo 3 Arcane Nails)

Sally Hansen Gem Crush 05 Be-Jeweled Swatch (Diablo 3 Arcane Nails)

Sally Hansen Gem Crush 05 Be-Jeweled Swatch (Diablo 3 Arcane Nails)

Sally Hansen Gem Crush 05 Be-Jeweled Swatch (Diablo 3 Arcane Nails)

Sally Hansen Gem Crush 05 Be-Jeweled Swatch (Diablo 3 Arcane Nails)

I think this polish is the PERFECT Arcane polish for something quick and easy. I might do some more advanced Arcane nails using a sponged technique like how I made the pastel galaxy but if you want some Arcane nails in a hurry, this is perfect! And affordable! Hello Cheap Polish Tuesday!

Anyone know how to get rid of this "underwater" "plugged" ear feeling when sick? Will it go away? I am honestly scared this is permanent! Anyone else enjoying Reaper of Souls for Diablo 3? I think the game is fixed and is absolutely AMAZING now! I am having so much fun! Now if I wasn't sick...