Monday, 10 March 2014

Bestie Nail Art Challenge - Week Two: Galaxies (Pastel Galaxy Nail Art Tutorial Inspired By LacquerStyle)

I totally had another post to sandwich between Bestie Nail Art Challenge Week One and this one, but alas I did that thing where I upload all the photos except for one and I couldn't post without it. Meow, so I just decided to have at it. So Caitlin from Addicted to Lacquer's and my Best Nail Art Challenge March continues with GALAXIES as the theme of Week Two!

Bestie Nail Art Challenge - Week Two: Galaxies

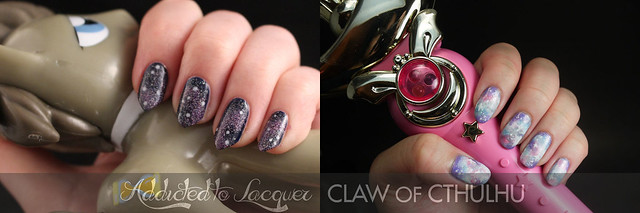
Caitlin opted for a purple galaxy pattern and I went for a pastel galaxy since it was my third attempt and I didn't want to do the same thing again (although I wanted to - sometimes when something works, it just feels right).

Bestie Nail Art Challenge - Week Two: Galaxies

Bestie Nail Art Challenge - Week Two: Galaxies

Bestie Nail Art Challenge - Week Two: Galaxies

Bestie Nail Art Challenge - Week Two: Galaxies

I remember that my first galaxy nails looked terrible and they always look OK at the end but right through the process they just don't look good at all. I needed some guidance and bumped into LacquerStyle's tutorial on how she made hers so I followed it. I also happened to photograph the whole thing for you. Spoiler alert: These things somehow took me a long time.

Bestie Nail Art Challenge - Week Two: Galaxies

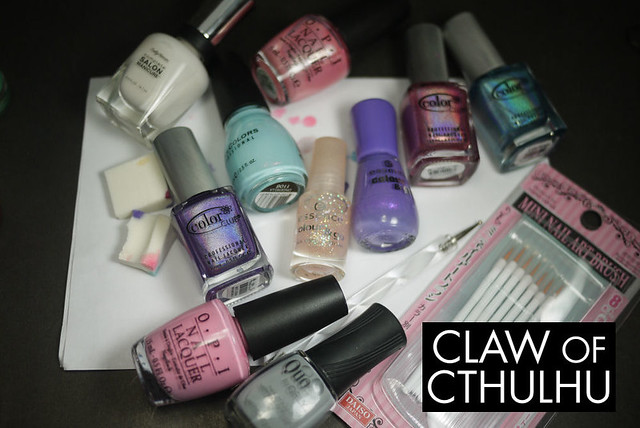
So here's a list of materials I used for my pastel galaxy nails:

+ make-up sponge
+ dotting tool
+ fine nail art brush
+ Quo by Orly Runway Ready (light grey base)
+ Essence Oh My Glitter! (purple shimmer)
+ Sally Hansen White Out (white creme)
+ Sinful Colors Cinderella (baby blue shimmer)
+ OPI Princesses Rule (baby pink shimmer)
+ OPI Pink Friday (baby pink creme)
+ Essence Space Queen (iridescent glitter)
+ Color Club Eternal Beauty (purple holo)
+ Color Club Miss Bliss (pink holo)
+ Color Club Over the Moon (blue holo)

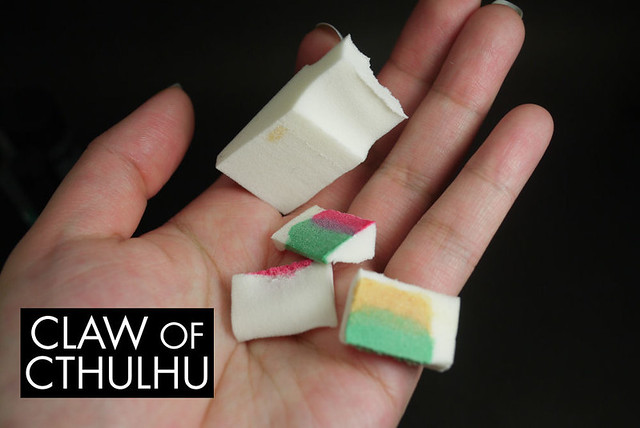
I didn't want to waste the make-up sponge I used for last week's gradient challenge so I actually tried to "reuse" last week's sponge by cutting it. I don't know if it was worth it but I felt less bad about it. And also there's nothing like working with a fresh sponge but alas.

Bestie Nail Art Challenge - Week Two: Galaxies

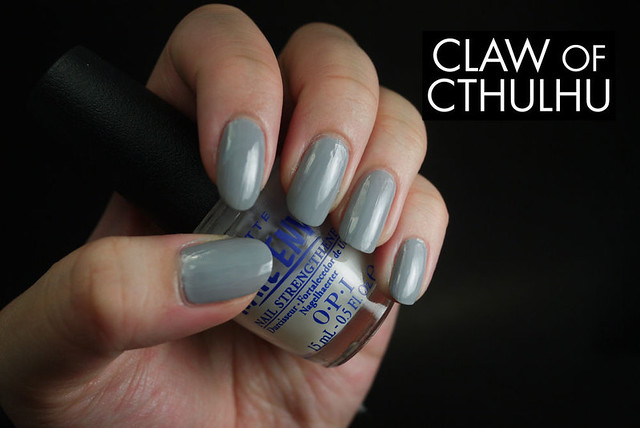
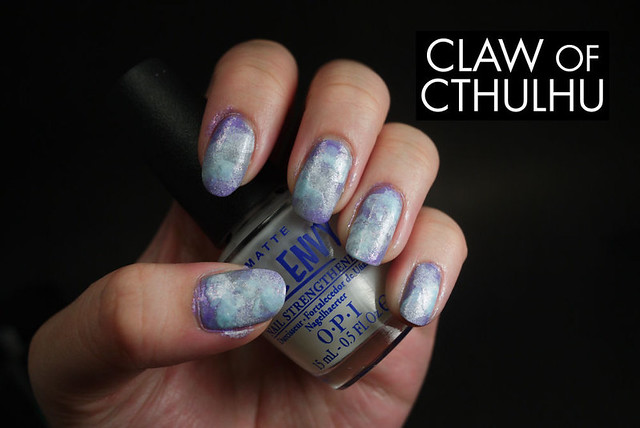
I started off with Nail Envy base coat (which I already had on since I didn't wear polish this week), and then put on two coats of Quo by Orly Runway Ready:

Bestie Nail Art Challenge - Week Two: Galaxies

Around the edges, I added Essence Oh My Glitter with a make--up sponge. (Oh good lordy it already looks terrible):

Bestie Nail Art Challenge - Week Two: Galaxies

Then I sponged on Sally Hansen White Out in C shapes (sorry I accidentally have some of the blue in this photo, IGNORE):

Bestie Nail Art Challenge - Week Two: Galaxies

Around the white galaxy shapes, I added some Sinful Colors Cinderella:

Bestie Nail Art Challenge - Week Two: Galaxies

Similar to the blue, I added some OPI Princesses Rule around the white shapes. However the polish was far too sheer, so I used a bit of OPI Pink Friday to beef up the colour:

Bestie Nail Art Challenge - Week Two: Galaxies

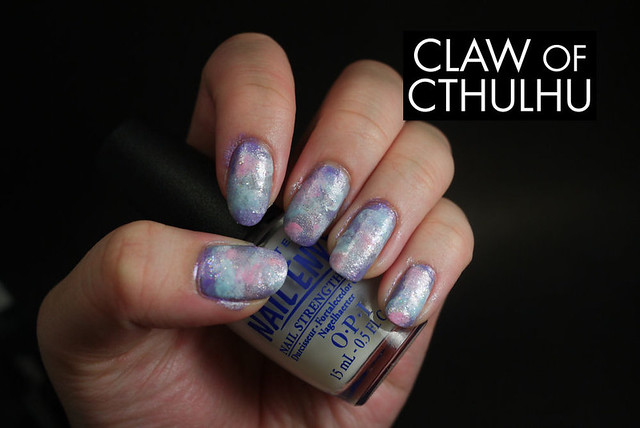
I went over some of the galaxy shapes with Sally Hansen White Out where I wanted some emphasis:

Bestie Nail Art Challenge - Week Two: Galaxies

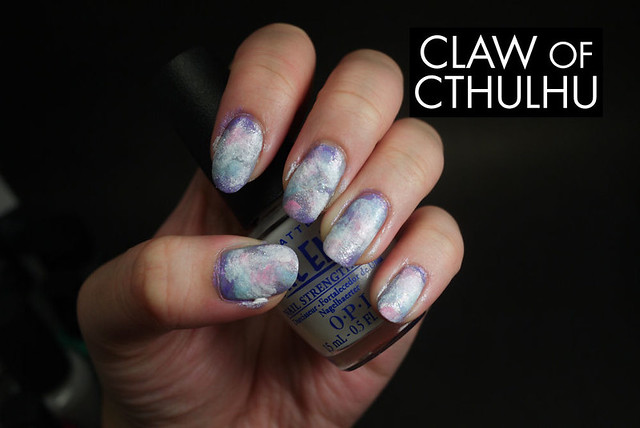
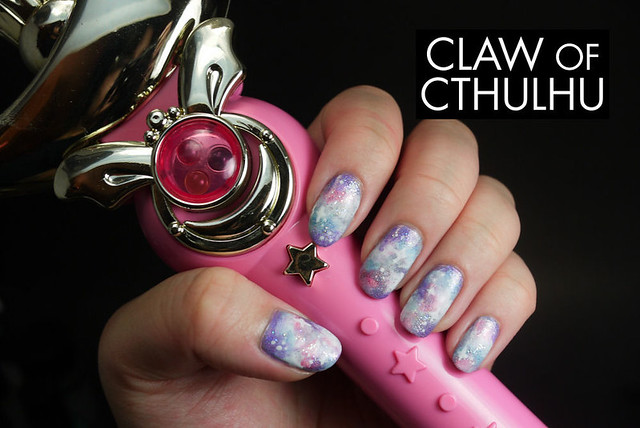
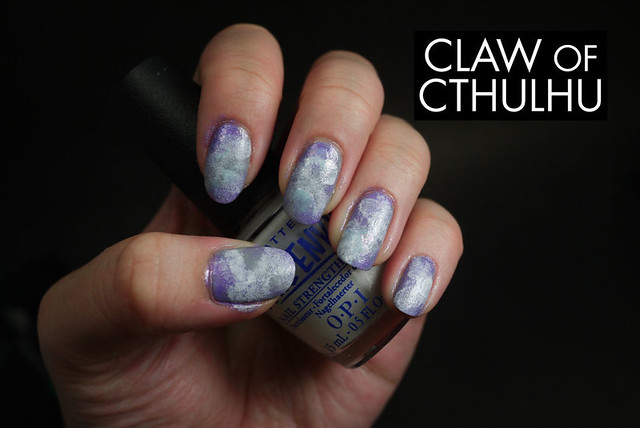
Then I added some highlights using Essence Space Queen, Color Club Miss Bliss, Color Club Eternal Beauty and Color Club Over the Moon:

Bestie Nail Art Challenge - Week Two: Galaxies

I used a dotting tool to make the smallest dots on my nail, and then dug out these Daiso nail art brushes I had purchased ages ago. Finally decided it was time to use them! The package said they were disposable but I just cleaned it with my remover and I'll save it for next time:

Bestie Nail Art Challenge - Week Two: Galaxies

Bestie Nail Art Challenge - Week Two: Galaxies

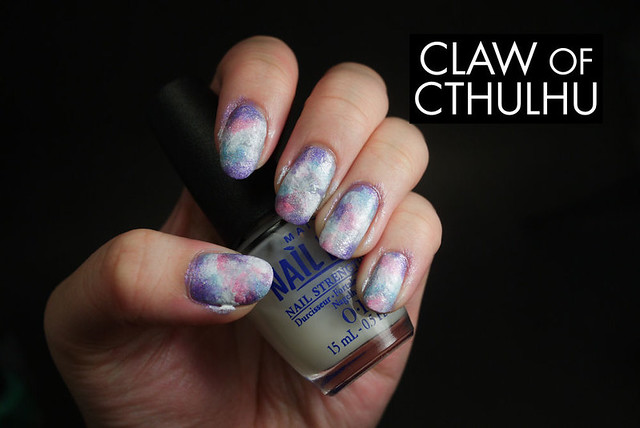
I added some cross shapes and then topped it off with Seche Vite:

Bestie Nail Art Challenge - Week Two: Galaxies

Bestie Nail Art Challenge - Week Two: Galaxies

Bestie Nail Art Challenge - Week Two: Galaxies

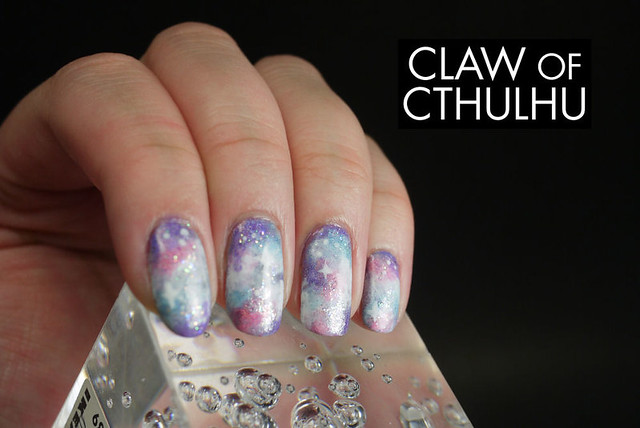
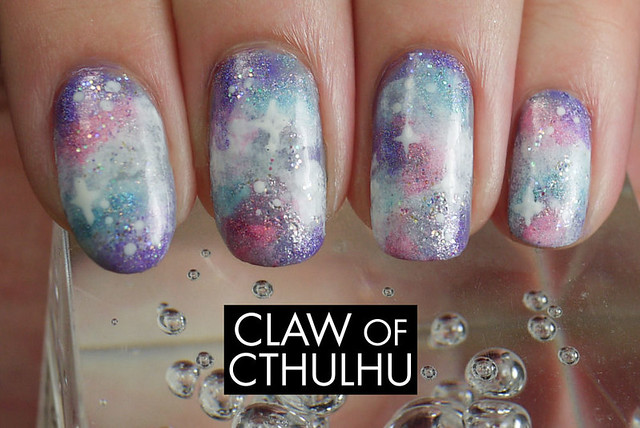
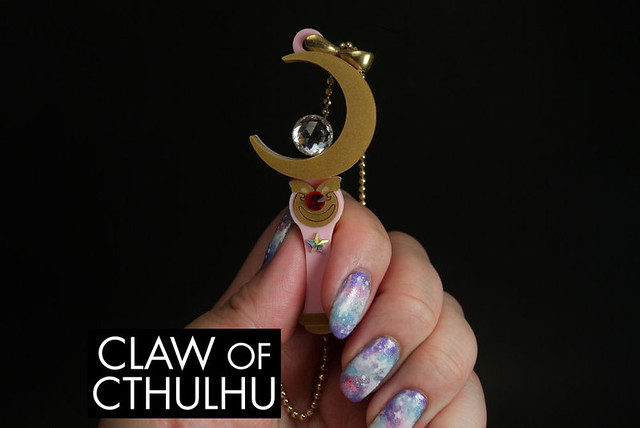
Honestly I don't know how they ended up looking semi-decent because throughout the whole process, I was just worried the entire time. I think it actually might just be the top coat. Somehow it just evens out everything! Who would have ever thought!

Have you ever tried galaxy nails? Do you share the same sentiments that they always somehow look bad right up until the very end? What's your favourite colour combination for your galaxies?

Monday, 3 March 2014

Bestie Nail Art Challenge - Week One: Gradients (Bonus: Nailz Craze NC04 Stamp Art)

So I don't know about you but I am still fighting the plague of death. I really tried to rest this weekend but I had to shoot a show and deliver a wedding so that ended up with working into the 5AM-6AM Hell hour on Friday and Saturday. But nonetheless, here I am. At least I've got this new nail art challenge I am taking up with my girl Caitlin from Addicted to Lacquer. I think she was the first person who discovered my blog and we've got on famously ever since! It's seriously overdue, but we finally decided to do bestie nails - normally I think people do matching 'twin' nails, but we decided to do our own take on the same theme. It's a lot of fun that way because we get to surprise the other with how we interpreted and executed the theme. We also decided to do it weekly because let's be real, I have commitment issues (and the need for 30 hour days, sigh). Anyway, this week's theme was GRADIENTS!

Bestie Nail Art Challenge - Week One: Gradient

Make sure you check out Addicted to Lacquer's Week One post! I love Caitlin's Rainbow Dash themed gradient nails! She clearly schools me but I just masked my bad sponging and gradient skills with stamping, hahaha! When in doubt...

I created my gradient nail art with the Essence 'Ticket to Paradise' collection, by sponging the colours over top a one coat foundation of OPI Alpine Snow. Believe it or not, there is actually a pattern to this - I tried to angle the gradient so they would make pseudo triangles across the nail but it didn't turn out that way. I used a make-up sponge that Rainbow Honey included with their Christmas "Large Mystery Bag" (which I will post later this week).

Bestie Nail Art Challenge - Week One: Gradient

Bestie Nail Art Challenge - Week One: Gradient

After making a huge mess, I cleaned up carefully around the edges.

Bestie Nail Art Challenge - Week One: Gradient

And for funsies, I totally remembered I have a fully functional Crescent Moon Wand from the 90s. Yeah, prized posession, absolutely! JUST BECAUSE!

Bestie Nail Art Challenge - Week One: Gradient

So I think I was really bothered by how much I suck at gradients, so I wanted to add some stamping to it. I'm a big fan of Nailz Craze plates and I have all of them but I am also terrible at it. Here's my best effort - yes I totally had to take a few shots at it before I could pick up this wonderfully intricate design! Here's a before and after:

BEFORE NAILZ CRAZE STAMPING:

Bestie Nail Art Challenge - Week One: Gradient

AFTER NAILZ CRAZE STAMPING:

Bestie Nail Art Challenge - Week One: Gradient

And apparently a ring switch was required, haha! Used one of my black Batman midi rings instead. I love these rings:

Bestie Nail Art Challenge - Week One: Gradient

I'm glad that Rainbow Honey tossed in some make-up sponges in their Large Mystery Bag because I didn't think I'd ever use them. I prefer make-up sponges over kitchen sponges because it's easily to build up the gradient and have a softer controlled transition. Make sure you check out Caitlin's blog to see her gradient art!

How do you do your gradients? Do you have any tips and tricks? Maybe the type of polish you use? What kind of patience is needed? Have you done bestie nails before?

Thursday, 27 February 2014

Rainbow Honey Electric Love Nail Art Glitter Swatch and Review

It's almost the end of the month, which (hopefully) means the end to shitty cold weather! Sickness that we give each other and last weeks! Seasonal depression! ALL OF THE THINGS! So, needless to say - I am excited. Let's move on forward already, shall we? Today I've got a review of one of the items I received in my Rainbow Honey February Mystery Bag - a brand spanking new product: nail art glitter. Poking around on social media, I found there were 3 different permutations.

Rainbow Honey Electric Love Nail Art Glitter (over Zoya Noot)

This particular permutation is Rainbow Honey Electric Love Nail Art Glitter (phew, that was a mouthful!). It's a small pot, plentiful filled with iridescent micro glitter, neon pink hearts, mega hexes and multi-sized squares, a slight off neon pink raspberry hex, and a pinch of neon lime stars. I went through a bit of trial and error with applying this as I've never played around with loose glitter before - totally foreign to me! As a foundation, I had one of my invoices folded so I could dump the excess back into the pot. At first, I would apply a coat of polish, and while wet, I would pinch a bit of the nail art glitter and throw it onto the nail... It didn't make for a lot of control!!! What I found worked a bit better was I took a couple of pinches and put them onto my working paper foundation. Then, I would essentially "pick" which glitters I wanted to have fall on the nail. I would pick bigger glitters first, then pick up the small ones. I think I've still got a ways away to get this looking good, but I did like my results!

As inspiration, I took Dee's glitter spill from Instagram and applied it to my nail. For the base, I used Zoya Noot. (I wish I had a slightly lighter grey but apparently out of 400+ polishes, I don't have one!)

Here's my successful one first, haha. This is where I used the method of spilling the glitter first, and then picking which glitters would fall onto the nail. I used Seche Vite to finish it off with a nice sleek finish:

Rainbow Honey Electric Love Nail Art Glitter (over Zoya Noot)

Rainbow Honey Electric Love Nail Art Glitter (over Zoya Noot)

Rainbow Honey Electric Love Nail Art Glitter (over Zoya Noot)

Now here's the go where I was pinching a bunch of random glitter from the pot and basically throwing it onto the nail. *headdesk* Yeah, that's me, clumsy ol Cthulhu. For this one, I finished it with the Rainbow Honey Unscented Top Coat, which I think might work as a usual top coat, but as a top coat for glitter - it dries too thin to have a nice even finish. The ridges of the glitter shapes still stand out. I'll have to re-evaluate it when I use a regular non-glitter polish. For now, Seche Vite is still my top vote, hands down:

Rainbow Honey Electric Love Nail Art Glitter (over Zoya Noot)

Rainbow Honey Electric Love Nail Art Glitter (over Zoya Noot)

Rainbow Honey Electric Love Nail Art Glitter (over Zoya Noot)

Rainbow Honey Electric Love Nail Art Glitter (over Zoya Noot)

You know, I actually ended up thinking this product was a lot of fun and produced a nice result. I was pretty apprehensive but once I figured out how to get more control of the glitter, it actually turned into a lot of fun. I did have some smearing with both top coats with this combination but I think it was due to my own impatience. I would still recommend to use Seche Vite as these glitters are a bit larger than usual and need that extra thickness to even the surface to a nice glossy finish.

What do you think about working with loose glitter? Do you have a favourite top coat for glitterbombs? Let's say good riddance to February already, have a good weekend guys!

Monday, 24 February 2014

Julep Dahlia Swatch and Review (Bonus: Barry M Boots Limited Edition D 335)

Well it's snowing here but when it snows here, my Eastern Canada friends always just laugh and tell me that we don't know what "real snow" is. To tell the truth, they're totally right. But still - whenever it snows here, no one manages to know what they're doing! Anyway I am trapped at work for a while so I'm just going to hope that by the time the day is done, I won't have to deal with traffic. One can hope. Anyway with all the snow news aside, I figure that now's a good time to show off a shade that my NPBFF Caitlin from Addicted to Lacquer gave me for Christmas.

This is Julep Dahlia, a shimmery-as-fuck, bright-as-fuck golden sunflower yellow. (There wasn't any way to describe it.) This polish was heavily pigmented and I got decent coverage with two coats. You can see my free edge in the right light, but it was mostly unnoticeable. Application went on smooth and was very impressive. Here's my swatch with no top coat:

Julep Dahlia Swatch

Julep Dahlia Swatch

Julep Dahlia Swatch

Julep Dahlia Swatch

I wanted to have a bit of PARTY! on my nails so I also put on a Barry M polish called Boots Limited Edition D 335 that I got from my BFF. (Boots is a drugstore in London, I think so anyway so I imagine this shade would just be an exclusive they had at one point.) No other descriptor can be found, and I couldn't find any information online about this one! Ah well, it's an assorted colour bar glitter. Here's two coats applied with different vertical and horizontal brush strokes:

Julep Dahlia Swatch (with Barry M Boots Limited Edition D 336)

Julep Dahlia Swatch (with Barry M Boots Limited Edition D 336)

Julep Dahlia Swatch (with Barry M Boots Limited Edition D 336)

Julep Dahlia Swatch (with Barry M Boots Limited Edition D 336)

Julep Dahlia is super bright so it's not a polish I would wear all the time. It's nice, through. What I didn't like about it was that it's a bit of a stainer! So just be careful with this one.

Do you like wearing BRIGHT-AS-FUCK colours on your nails? If so, do you save them for cold wintery days, or do you coordinate with the summer weather? Also, I totally just did 100 skips with my skip rope and it was a sure sign that I need to work out on a regular basis. #fml #officelife

Tuesday, 18 February 2014

Valentines Day (Sort Of) Themed Skittles Nail Art

Hey everyone, I know I am kind of late on the train to posting these but I figured I would paint my nails for Valentines Day anyway even through I am kind of a Scrooge about the whole thing. Kind of. I can be romantic... When I want to be... I think. Anyway I was contemplating for probably close to 30 minutes on what to do! I guess this is what happens when you have too much polish? I knew I wanted to revisit Rainbow Honey's first limited edition polishes for the month of February last year - Dearly Beloved. This was even back then when they had sticker labels instead of the nice sleek screen printed ones they have now. *sniff* They grow up so fast!

Anyway I wanted to center the focus on Rainbow Honey Dearly Beloved. There was a part of me that wanted to open up Sweet Talk: Part 2 but I guess with the broken nails, I was too grumpy to do it! But nonetheless, I used OPI Black Onyx, Fancy by Rainbow Honey Fancy Red, Rainbow Honey Gilded Angel and Rainbow Honey Dearly Beloved, of course. I think it turned out well! I wanted it to be fun, but not too crazy or distracting. Here's what I came up with:

Valentines 2014 Skittles Nail Art

Valentines 2014 Skittles Nail Art

Valentines 2014 Skittles Nail Art

And because it's Valentines Day and everyone needs a little love, including my Cinderella hand... My claddagh ring, straight out of Ireland makes an appearance too:

Valentines 2014 Skittles Nail Art

Valentines 2014 Skittles Nail Art

I know most of you had long weekends so I hope you guys all had a nice long weekend! I am jealous! Haha, I want a long weekend! (Even though I totally just had one last week, but you can never have enough 4 day work weeks, right?) I just shot the PIXIES last night so that was SUPER exciting for me as a huge fan. What did you guys get up to for the long weekend? Any fun nail art you did for Val/Galentines Day?

Thursday, 13 February 2014

Rainbow Honey February Mystery Bag: Unboxing!

OK I am going to try something a little different here. As you might have read, I broke not just one but two nails while moving around computers at my work, so I will be spreading out my backlog a little more. I'm buying an extra day of post! So typically I show off just nail art and nail photos but I personally get SUPER FREAKING excited when I get nail mail - and Rainbow Honey has introduced their "mystery bags" in Christmas. It was a HUGE hit that they introduced them again for February and I have a sneaky feeling that they're here to stay. Why?, you say? Because this one was explicitly labelled as "February's Mystery"... Oh God, more to come? IN EITHER CASE, LET'S GET TO THE UNBOXING!!! (And don't laugh at my broken thumbnail, siiiigh!)

So it came in a simple pack like this:

Rainbow Honey February Mystery Bag Unboxing

Upon opening, revealed a bubble wrapped pack:

Rainbow Honey February Mystery Bag Unboxing

Rainbow Honey February Mystery Bag Unboxing

ALL OF THE CONTENTS! OH MY GOD, ALL THE COLOUR!

Rainbow Honey February Mystery Bag Unboxing

Here's the "February's Mystery" card. Oh God, "February's Mystery"? Does that mean another one is coming?!

Rainbow Honey February Mystery Bag Unboxing

Rainbow Honey February Mystery Bag Unboxing

Rainbow Honey February Mystery Bag Unboxing

Here's what the card read:

Front: February's Mystery / Rainbow Honey

Inside: Greetings from the Rainbow Honey Lab! Thanks for picking up this month's Mystery Bag! This time around, our selection includes: Sparking Agave - from our upcoming Midnight Garden Collection, coming March 2014 / Poffin Party - this one's still a prototype so let us know what you think! / Sakura Matsuri Mini Rollerball - making a return later this spring! / Fast Dry Top Coat - goes perfect with our new... / Nail Art Glitters - a first look at some awesome blends of glitters ready for nail art, decorating, or wherever your creativity takes you!

Back: We hope you've enjoyed this month's look at some of our upcoming products! And since it's not longer a mystery, tell us what you loved the most - and tag your posts to make sure we see them! / #RainbowHoney #RainbowHoneyLab #RainbowHoneyMysteryBag / Thank you again for being such a loyal fan! Love, The Rainbow Honey Lab (see you in March!)

Wait wait wait - SEE YOU IN MARCH?!?! OH GOD ANOTHER ONE IS COMING!!!!

Anyway, here's the new nail art glitter. This is a brand new product, in my knowledge of Rainbow Honey, I don't think they've had a product quite like this. I got a nail art glitter called "Electric Love". It made a bit of a mess in my Mystery Bag with some loose glitters sitting right in the bubble wrap pack but nothing too severe. Looks like this one consists of opalescent microglitter, neon lime stars, hot pink hearts and squares, and matching lime green and hot pink smaller hex/square glitter. Not sure how applying this will be clean at all - might be a mess! But nonetheless, colour me intrigued. (And neon!)

Rainbow Honey February Mystery Bag Unboxing

Rainbow Honey February Mystery Bag Unboxing

Rainbow Honey February Mystery Bag Unboxing

This is the Sakura Maturi Eau De Parfum Mini Rollerball - and I'll be honest, I don't remember Rainbow Honey offering perfume before. I was pretty tunnel visioned with the MLP polish though, so that could be why. Anyway, apparently this guy is "making a return" for the spring. I personally LOVE the small of Sakura Matsuri - I was first introduced with the scent with the cuticle sticks and I freaking LOVE IT. This tiny package is also super freaking cute. I am dying. Check out the mini cuteness:

Rainbow Honey February Mystery Bag Unboxing

Rainbow Honey February Mystery Bag Unboxing

Rainbow Honey February Mystery Bag Unboxing

Rainbow Honey February Mystery Bag Unboxing

And now my favourite part... THE POLISH MINIS! I got Poffin Party, Sparkling Agave (love that name) and Unscented Top Coat. How coincidental is it that Poffin Party matches the palate of Sparking Agave perfectly? Initial thoughts: Sparking Agave looks shimmering and amazing. Really love that shade and the name sake! Seriously can't wait to swatch it. Poffin Party, I gotta swatch - I think dot/circle glitter can be hit or miss and depending on the glitter. I've seen a lot of circle/dot glitter to be quite thick and it's very unflattering - not sure if it's just something I see, or what not. Anyway, I can't really tell from the mini bottle if the glitters are thick or not, but I gotta say that I love that colour palette! Reminds me of a subdued Magic Cake!

Rainbow Honey February Mystery Bag Unboxing

Rainbow Honey February Mystery Bag Unboxing

Rainbow Honey February Mystery Bag Unboxing

So I hope you enjoyed this "UNBOXING" post! I know it's not my nails, but my thumb and index nail are hurting and I think it'll be a couple of weeks to get some growth back.

Do you like these kinds of UNBOXING posts? Should I keep going with it? Did you grab Rainbow Honey's February Mystery Bag? What did you get? Are they the same? Or are there a few permutations going around? Be sure to let me know - as a huge fan, I'd love to know!