
So, here we go. (Also, it's the first time I've tried using a black background and I think I like it! Hope you do too.)
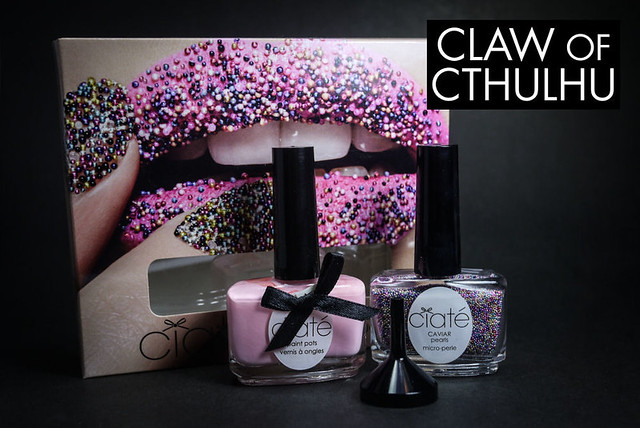
Here's the packaging it came in and it's so gorgeous. The photo is awesome! It's a little silly because the beads are definitely not supposed to be used on the face whatsoever but it's such an awesome photo and definitely close to some of the candy ideas I've had floating in my mind for photoshoots.
The set comes with: 1 bottle of rainbow "caviar" micro beads, 1 bottle of "Strawberry Milkshake" paint pot nail lacquer, 1 funnel, instructions, and the plastic casing the bottles are stored in can be used as a bead catching tray.
The formula on Ciate Strawberry Milkshake is very smooth and dries fast. I don't think I've worked with a formula quite like this. It's very milky! You get a very good foundation with 1 coat, but I used 2 for full coverage.
As for the caviar part, it is suggested to work with one nail at a time. Paint one coat, let dry, and on the second coat, while it's still wet, sprinkle the caviar microbeads with the tray underneath to catch the excess. This part was surprisingly very fun. You're then instructed to "Press gently to secure the beads" and this part for me was kind of tedious. Maybe my fingers get sweaty or something when I am painting my nails, but when I pressed down (even gently), I would pick some of the beads up. It wasn't too bad though, I didn't get many bald spots on my caviar highlight nail.
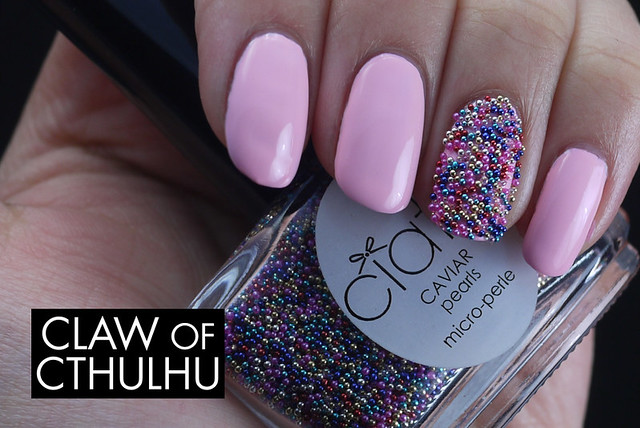
I used Seche Vite top coat on the Strawberry Milkshake nails but left the caviar highlight nail without top coat. It is recommend that if top coat is a must, to only use it on the tips. Just as an experiment, I used top coat afterwards and it looked awful. The colours were lost and the nail felt weighted. Definitely do not use top coat.
It says the manicure lasts for 48 hours but I personally could not handle having it on for more than a day. It was really pretty and fun to look at but I just kept picking at it! I think the Ciate caviar sets are great for perhaps an all-day party. I am sure that it's quite possible to get 48 hours and maybe for some, even more but I would rather not have the little beads lost, especially if you have pets or kids around the house.
Anyway, I had quite the birthday find! I FINALLY found the liquid sand polishes from OPI's Mariah Carey collection! I already swatched them but I've got more to post from the pipe this week so perhaps I'll post em next week.
I've been thinking about trying that myself. Not sure if it's worth it for me though, I'm so rough on my nails :( I love the colors tho, you're exactly right! It reminds me of cupcakes too, very cute for a B-Day mani. BTW, I'm totally diggin' the black background. I really need to make a light box, is that how you get your photos to look so good? Lol, after you visit my blog you will understand why I'm in awe over your amazing photos ;)
ReplyDeleteCaviar is so fun! Buuuuut I definitely think it's one day wear only. I couldn't stop picking at it the next day, but I have really bad tendencies like... picking scabs, picking at peeling healing tattoos, haha. Wow, sorry that was gross. :) Anyway, yes I use a light box! I'll have to take a photo of it once I am happy with it. I am still trying to figure out a set up that really picks up the colour as closely to how it looks in person. Actually, one of my favourite nail bloggers has posted her light box set up, it might give you a good idea on how to start. Mine looks pretty similar, but mine is also big because I use it to photograph paintball equipment as well, haha.
Deletehttp://www.kaylashevonne.com/2012/07/my-photography-setup.html
Hope it helps you out!
Sweet! Thank you :) I appreciate any advise, my photos are terrible lol
ReplyDelete